
Studio / Vectorworks Studio
Scenic Design Vectorworks Standards
Project files, layers, Graphics classes, venue references, and drawing packages for the Scenic Design Template.
Download the setup and file standards PDFThis guide explains the basic scenic drafting system in the Scenic Design Template, developed from USITT drafting standards. It connects the template’s Graphics classes and drawing conventions to organized scenic files, venue information, and clear drawing packages. Use it alongside the template, from the first groundplan through the final archive.
For the illustrated line-weight and symbol explanations, open the separate Scenic Drafting Graphics guide.
Venue master → Scenic file → Published drawing set
Project files
Shared location. Use a production folder agreed on by the team. Keep venue masters, current design files, issued PDFs, and archives in clearly labeled locations. The storage service can vary by production.
Current and archived files. Keep a stable filename for files used as references. Archive prior versions separately before replacing the current file. Date issued PDFs so the team can identify the drawing package in use.
| File type | Naming pattern | Example |
|---|---|---|
| Venue architecture | VENUECODE-VENUE.vwx | VEN-VENUE.vwx |
| Scenic design | SHOW-VENUE-SET.vwx | SHOW-VEN-SET.vwx |
| Issued drawing set | SHOW-VENUE-SET-YYYY-MM-DD.pdf | SHOW-VEN-SET-2026-10-02.pdf |
Agree on abbreviations
Use short, recognizable show and venue codes. SET identifies scenery; VENUE identifies shared venue information. Retain LTG, SND, and VID only when those departments are exchanging files. Apply the same codes to layers, classes, and resources.
In this guide
Project files • Layers and sheets • Graphics classes • Venue references • Drawing issue
Layers and sheets
Design layers organize drawing geometry. Sheet layers assemble the drawings for publication. Classes control the categories and graphic appearance of objects across layers.
Design layers
| Layer | Purpose |
|---|---|
| VENUE-STAGE GP | Shared stage architecture and venue geometry |
| VENUE-HOUSE GP | Audience area and seating geometry when needed |
| VENUE-2D SC | Existing venue section when supplied |
| SET-GP | Scenic groundplan |
| SET-SC | Scenic section work |
| SET-DETAILS | Scenic detail geometry |
Use the venue master’s actual layer names for referenced layers. The names above are a consistent starting convention; do not rename the source’s layers merely to match this list. Add scenic layers only when they help separate useful work.
Sheet layers
One sheet per drawing. Create a sheet for each published drawing. Use coordinated sheet numbers and clear titles such as Groundplan, Section, Elevation, or Scenic Details.
Sheet content. Place viewports, title blocks, borders, and sheet notes on appropriate sheet classes. Keep model geometry on design layers. Use viewport annotations for notes and dimensions tied to an individual view.
| Sheet size | Dimensions | Use |
|---|---|---|
| D size | 24 × 36 in | Large production drawing set |
| Tabloid | 11 × 17 in | Reduced set or compact details |
| Letter | 8.5 × 11 in | Small details and reference sheets |
Choose the sheet size with the production team. Make the drawing scale readable at that size, and include the scale in each drawing title. A reduced print must be identified as reduced; a scale bar helps readers check it.
Classes and graphic standards
Keep the class list as small as the drawing requires. Use meaningful names so another designer can find, isolate, and print the right objects without guessing.
A consistent hierarchy
Example: SET-SOFTGOODS-LEGS. Use SET-MAIN for primary scenery, SET-REF for scenic reference information, and SET-SCENE followed by a useful scene label when visibility changes by scene.
| Venue classes | Typical content |
|---|---|
| VENUE-FLOOR / VENUE-WALLS | Stage floor, walls, doors, and fixed structure |
| VENUE-BATTENS / VENUE-FLYRAIL | Venue battens and line-set reference |
| VENUE-REF-CL / VENUE-REF-PL | Centerline and plasterline reference |
| VENUE-SOFTGOODS | Venue masking, with component subclasses |
| VENUE-AUDIENCE | Seating, audience floor, and sightline context |
Graphics classes for 2D components
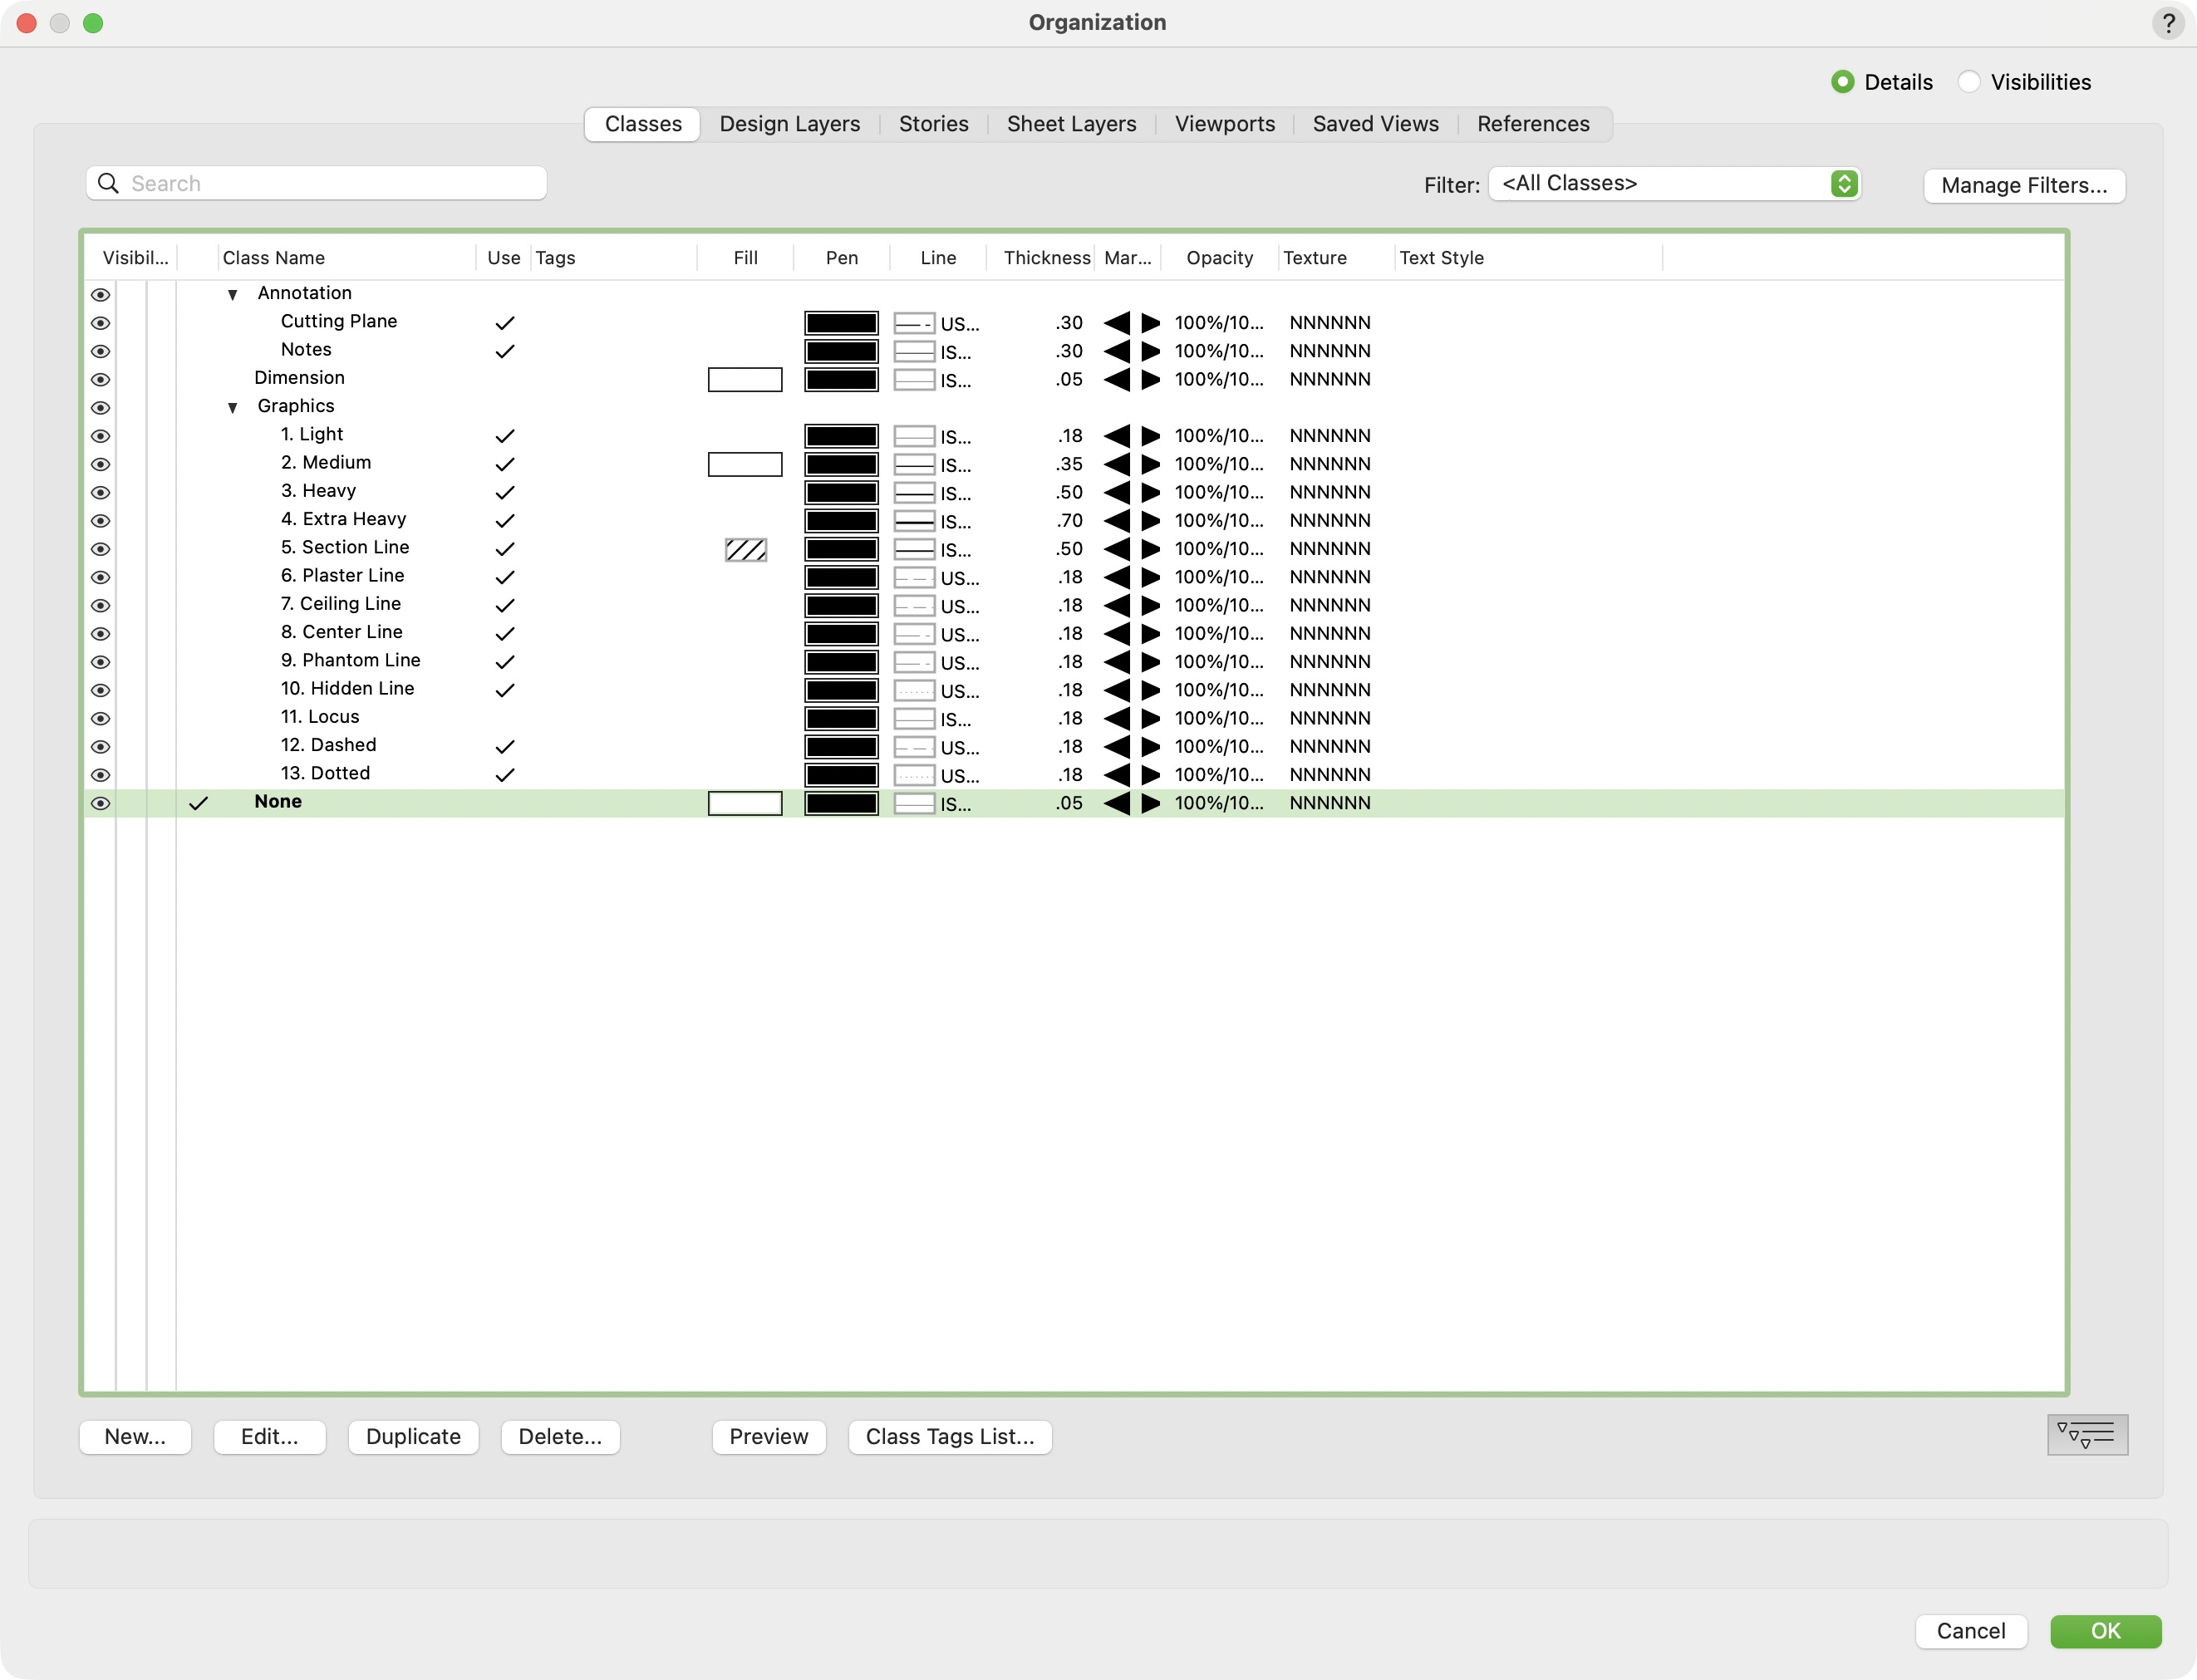
Vectorworks 2026 Organization dialog showing the numbered Graphics hierarchy and line thicknesses.
Use the numbered Graphics hierarchy: 1. Light, 2. Medium, 3. Heavy, 4. Extra Heavy, 5. Section Line, 6. Plaster Line, 7. Ceiling Line, 8. Center Line, 9. Phantom Line, 10. Hidden Line, 11. Locus, 12. Dashed, and 13. Dotted.
The displayed template uses 0.18 mm for Light and the line-pattern classes, 0.35 mm for Medium, 0.50 mm for Heavy and Section Line, and 0.70 mm for Extra Heavy. Set pens to black and use class attributes. Check line weights on a print at the issued scale.
For hybrid symbols, distinguish the instance’s category from the classes of its internal 2D and 3D components. Test visibility with both the container class and component classes enabled. Use SET- for scenery, LTG- for lighting, VENUE- for venue information, and Graphics- for graphic attributes.
Reference the venue
Maintain a shared architectural master and keep show-specific scenery in the scenic file. Agree on the origin, units, and reference method before exchanging drawings.
Set up the scenic file
1 Start from a template. Confirm units, design-layer scale, sheet size, classes, and title-block fields. Save the scenic file in its agreed location.
2 Establish coordinates. Confirm the stage centerline, plasterline, and elevation datum with the venue master. Check a known dimension before placing scenery. Use the agreed coordinate system for all reference geometry.
3 Choose the reference method. Use a referenced design-layer viewport where supported and appropriate. Layer import referencing remains an available workflow. Choose one approach with the team and document it in the template.
4 Bring in what is needed. Reference stage architecture, house geometry for sightlines, and the venue section where useful. Include battens and soft goods when they affect the scenic design.
5 Check the drawing. Verify alignment in plan and section, then create scenic layers and saved views. Confirm reference visibility in the sheet viewports before publishing.
Update references deliberately
When the venue or another department issues a revised file, archive the previous source, replace or relink the current reference, and update it in the scenic drawing. Review the affected sheets before issuing a new package.
Protect the source. Treat referenced architecture as shared information. Make permanent architectural corrections in the master file through its owner. With layer import referencing, local edits to referenced content can be overwritten by the next update.
Check after every update. Look for moved architecture, changed line sets, missing resources, altered masking, and naming conflicts. Confirm that the reference points still align.
Vectorworks reference guidance
For the reference commands supported by your installed version and license, consult Vectorworks Online Help. Menu locations and available reference methods can vary.
Scenic resources and coordination
Organize reusable objects so they can be located, revised, and exchanged without rebuilding the drawing. Keep venue resources separate from show-specific resources.
Resource Manager
| Folder or prefix | Content |
|---|---|
| VENUE | Venue architecture and shared reference symbols |
| SET | Show-specific scenic symbols |
| SET-SOFTGOODS | Show-specific masking and fabric elements |
| SET-TEX- | Scenic texture naming prefix |
| Hatches / Textures | Resource-type folders as needed |
Use descriptive resource names and consistent discipline prefixes. Add subfolders when they improve navigation. Useful Favorites include people, scenic furniture, soft goods, scale bars, and commonly used scenic components. Resource organization may need cleanup after referencing or importing.
Fly rail and line sets
Use the venue’s fly-rail information as the starting point. Place a scenic working copy on SET-REF-FLYRAIL, aligned to the agreed drawing origin. Identify the scenic loads and masking needed for the production. Coordinate changes with the venue and other departments.
If the source is a symbol configured to convert to a group, placing it produces an editable group. Otherwise, preserve the source symbol and create a separate working copy. Keep the plan and section representations coordinated; check positions against the venue’s line-set information.
Soft goods
Confirm whether the venue master includes a repertory hang. Use its component classes to control legs, borders, cyc, and scrim visibility. For a custom hang, create show-specific scenic resources and document the revised positions in plan and section. Hide superseded venue masking in the affected views.
Lighting coordination
Include lighting positions only where they affect scenic clearances, masking, sightlines, or access. Keep the lighting designer’s information separately referenced and coordinate changes to shared battens or overhead space. Fixture libraries, label legends, circuitry, and light-plot setup belong in the lighting department’s documentation.
Templates and drawing issue
A reusable template should carry the agreed drawing structure into each production. Keep it independent of a school, venue network, or individual computer.
Build a useful template
Drawing settings. Set units, design-layer scales, sheet sizes, and a consistent coordinate convention. Include only the layers and classes needed for a typical scenic package.
Publication settings. Prepare title blocks, drawing titles, page numbers, standard notes, and sheet viewports. Leave production-specific fields ready to fill in.
Resources. Include commonly used scenic symbols, hatches, textures, and Graphics classes. Store venue masters and production-specific assets separately.
Workspace. Choose a tool and palette arrangement that supports your drafting process. Keep a backup of custom workspace files and verify compatibility when changing Vectorworks versions.
Before issuing drawings
-
Files. Confirm the current scenic file, stable reference paths, and archived prior versions.
-
References. Update the needed references and check known dimensions, origin, and alignment.
-
Visibility. Review layers, classes, masking, and referenced coordination information in every viewport.
-
Drawing information. Check sheet numbers, drawing titles, dates, revisions, units, scales, and title-block fields.
-
Graphic quality. Review dimensions, line weights, hatches, dashed lines, and legibility at the issued paper size.
-
Published PDF. Inspect every sheet for clipped views, missing fonts, blank pages, and incorrect page size.
-
Communication. Place the issued package in the shared location and notify the production team of the revision and affected drawings.
Keep the archive usable
Retain the issued PDF with the native scenic file and the source files needed to resolve its references. Keep superseded packages in the archive so the current issue is clear.
Further reference
Vectorworks Online Help provides version-specific commands and reference options. Use the help for the version installed on your computer.
Template and reference dialogs
These screenshots show the macOS interface in Vectorworks 2026. Use the production template and reference method agreed on by the team.
Start with the template
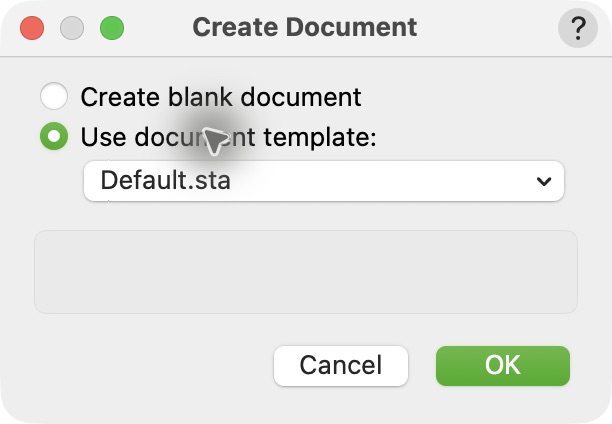
File > New opens Create Document. Select Use document template and choose the scenic template.
Default.sta is the selection shown in this screenshot. Choose the appropriate scenic template for the production; the template name is independent of a school or training program.
Choose the reference method
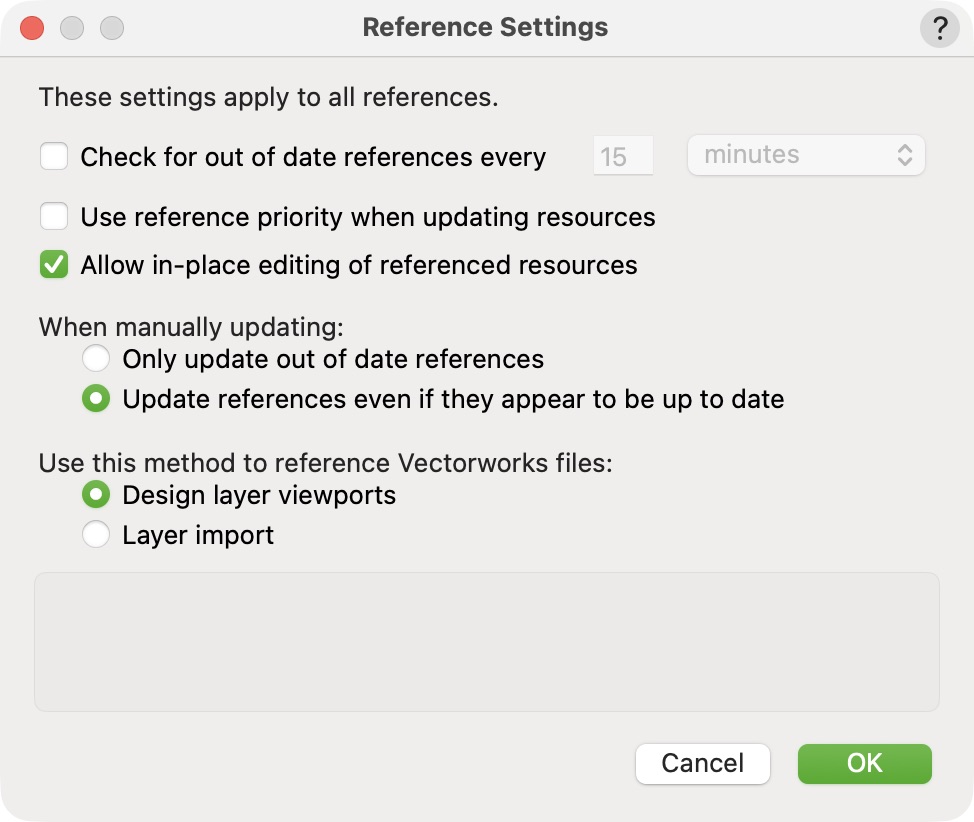
Tools > Organization > References > Settings opens the reference-method controls.
Design layer viewports is selected here. Layer import is the alternate method. Confirm this choice before adding venue references. Review the update and resource-editing options with the team rather than copying every checkbox from the screenshot.
Workspace and quick preferences
Use the View Bar for the current view, layer, class, scale, and zoom. Use the Navigation palette for class visibility. Workspace arrangements can differ between computers.
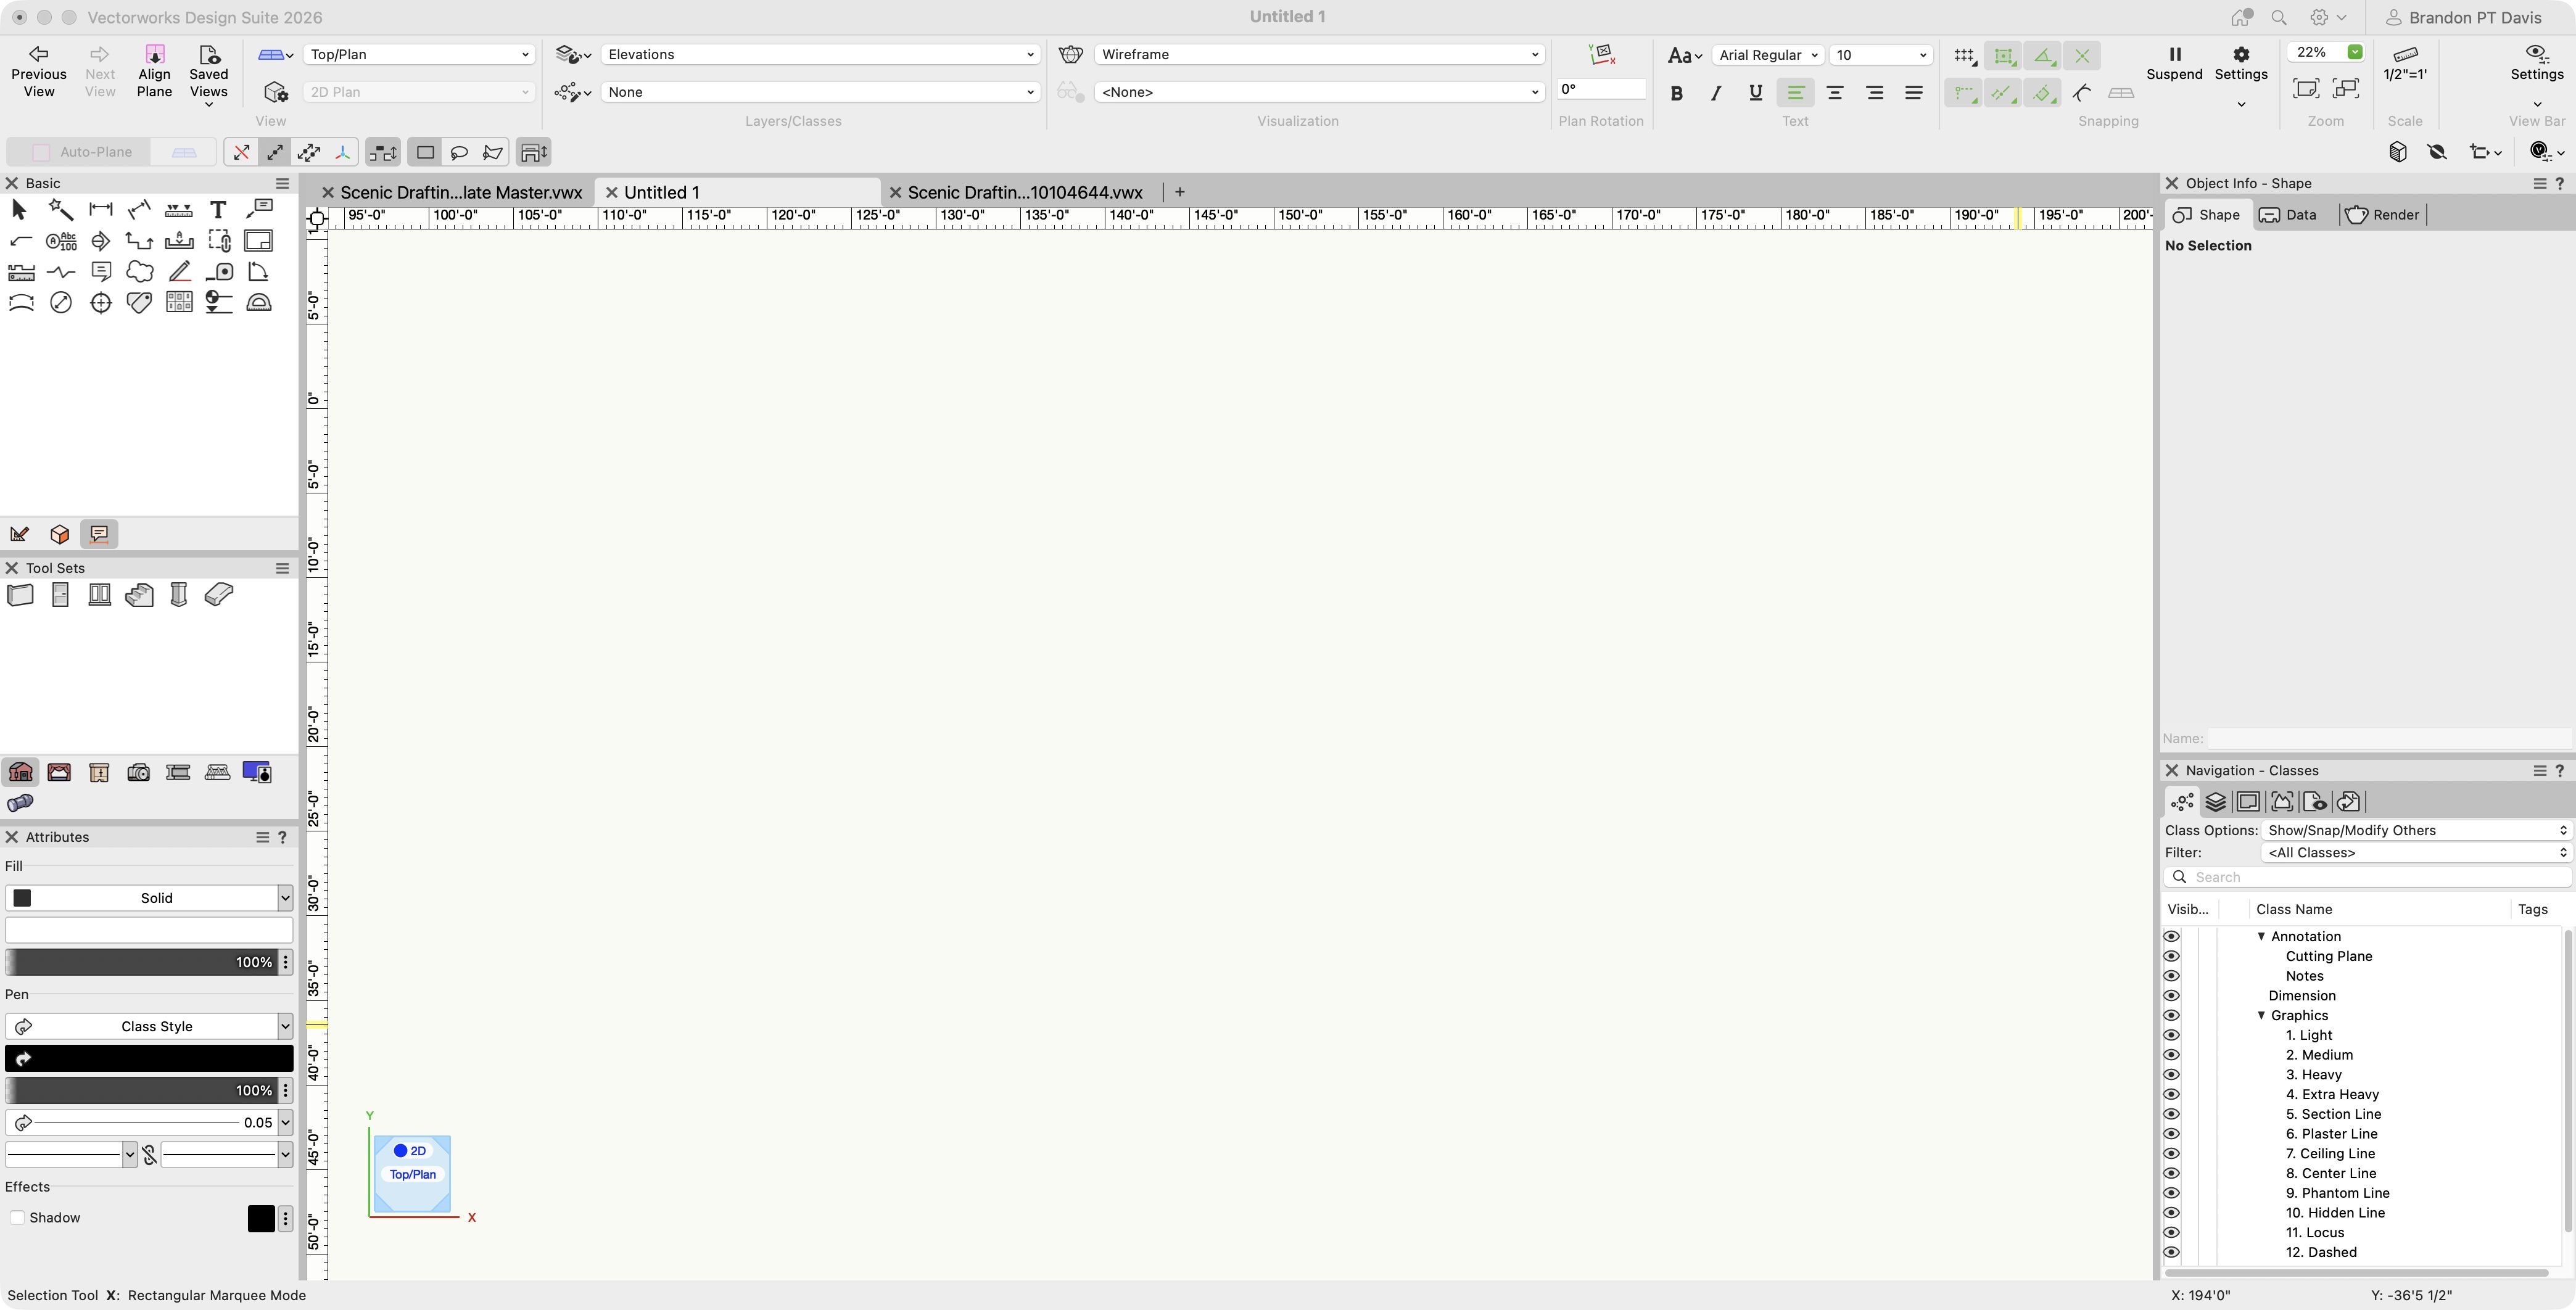
Vectorworks Design Suite 2026 with the scenic workspace and Graphics classes visible in the Navigation palette.
Quick Preferences
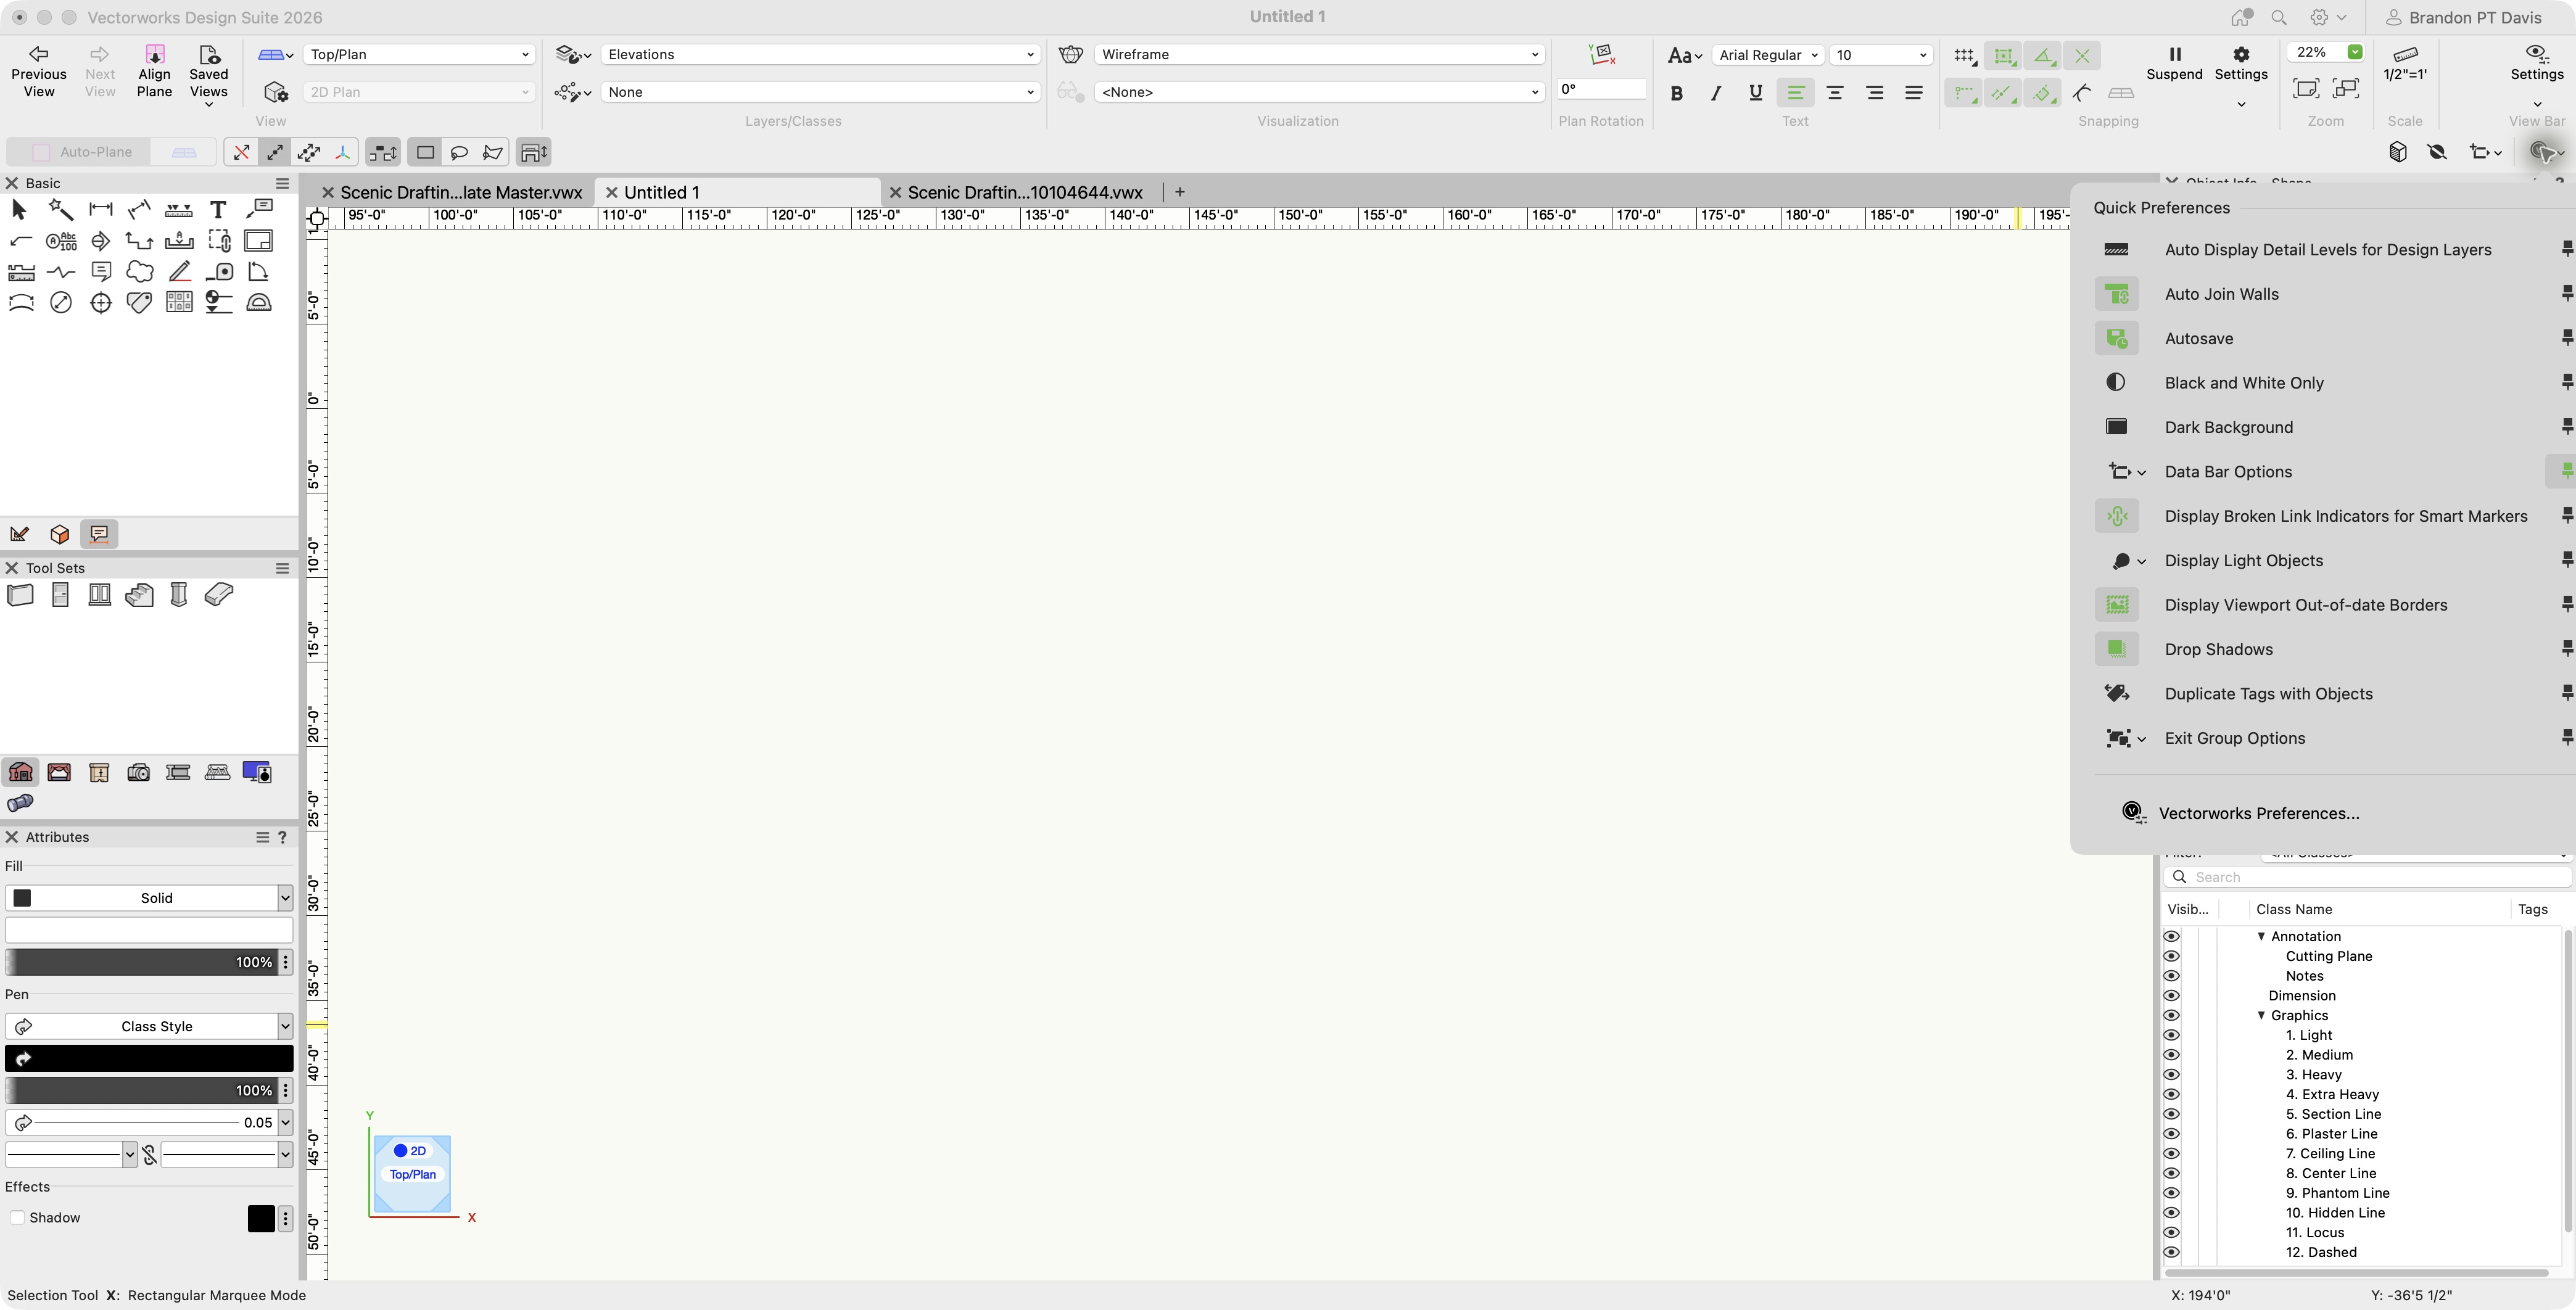
Quick Preferences provides display controls and shortcuts to preferences.
Review Black and White Only, Dark Background, and other display options here. Pin frequently used settings. Use Zoom Line Thickness to review the drawing on screen; check the published PDF separately.